
About Adfalcon :-
AdFalcon – the first mobile advertising network in the middle east & north Africa
Serving over 8.7 Billion ad requests per month & 37.1 Million users
Platform :-
- Android.
- iOS.
Payment method
- Bank Acoount.
- Paypal.
Payment terms :-
- Publisher accepts and agrees that transfer of payments by Company shall only be made if its share of net revenue exceeded the amount of 100 USD. Otherwise, due payments to Publisher will be transferred to and accumulated with next payment.
- Publisher accepts and agrees that its payments from Company shall be made every 65 days commencing from the first day after the end of month where the revenue that has been generated.
—> Frist Open adfalcon Account And Get app ID.
After Getting All Information Start Eclipse And Create New Project.
For google_play_services import project from the J:\android-sdk-windows\extras\google\google_play_services\libproject
—> AndroidManifest.xml
<uses-permission android:name="android.permission.INTERNET" />
<uses-permission android:name="android.permission.ACCESS_NETWORK_STATE" />
<uses-permission android:name="android.permission.ACCESS_FINE_LOCATION" />
<uses-permission android:name="android.permission.WRITE_CALENDAR" />
<uses-permission android:name="android.permission.READ_CALENDAR" />
<uses-permission android:name="android.permission.WRITE_EXTERNAL_STORAGE" />


<meta-data android:name="com.google.android.gms.version"
android:value="@integer/google_play_services_version" />


<activity
android:name="com.noqoush.adfalcon.android.sdk.ADFActivity"
android:configChanges="keyboard|keyboardHidden|orientation|uiMode|screenLayout|screenSize|smallestScreenSize"
android:theme="@android:style/Theme.Black.NoTitleBar.Fullscreen"
android:hardwareAccelerated="true"
>
</activity>
<activity
android:name="com.noqoush.adfalcon.android.sdk.ADFBrowser"
android:configChanges="keyboard|keyboardHidden|orientation|uiMode|screenLayout|screenSize|smallestScreenSize"
android:hardwareAccelerated="true">
</activity>
<activity
android:name="com.noqoush.adfalcon.android.sdk.ADFCanvas"
android:configChanges="keyboard|keyboardHidden|orientation|uiMode|screenLayout|screenSize|smallestScreenSize"
android:theme="@android:style/Theme.Translucent.NoTitleBar"
android:hardwareAccelerated="true">
</activity>
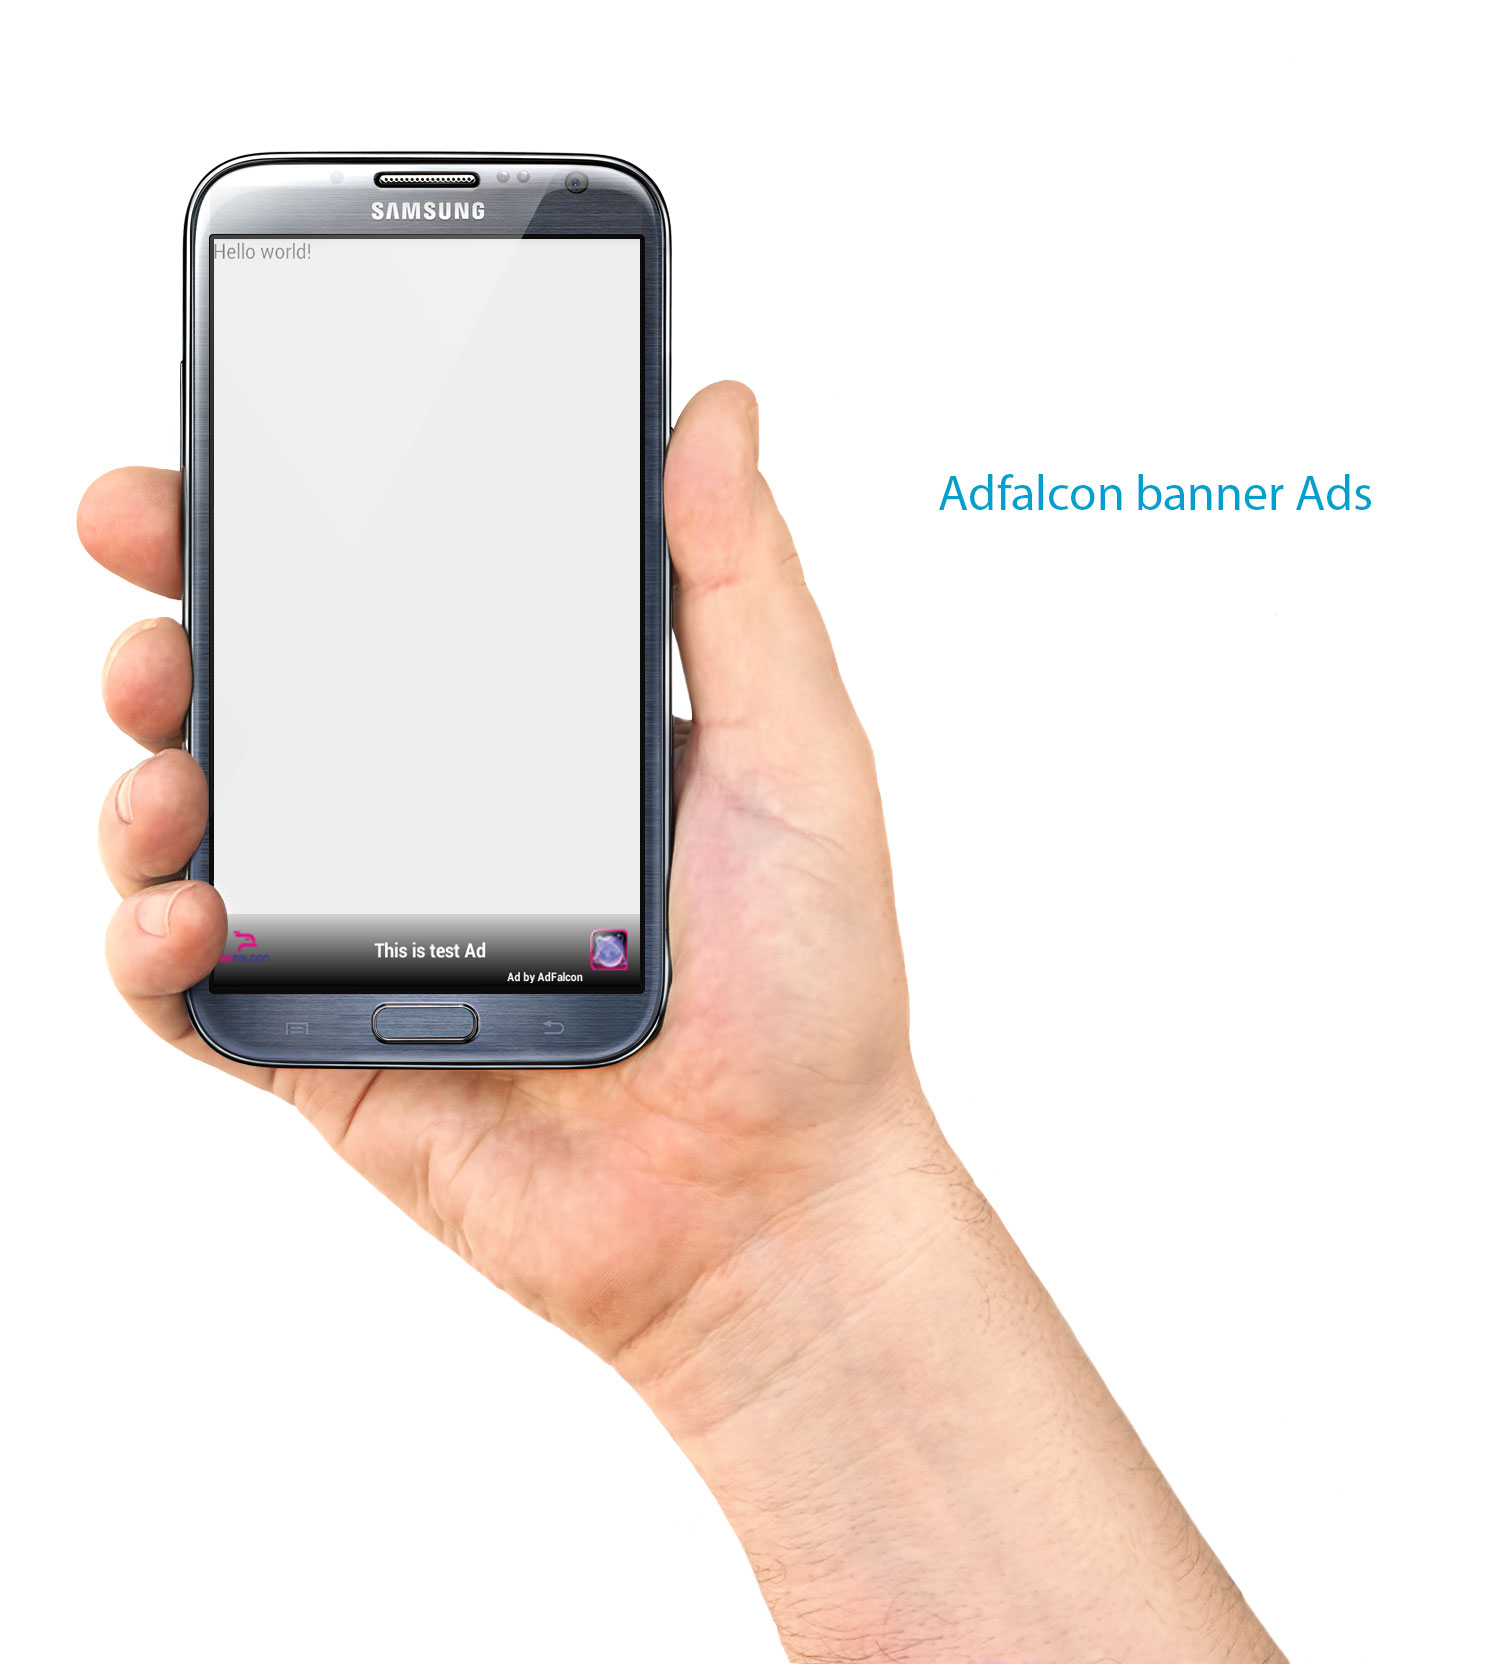
–> For Banner Ads Open Layout.xml File.
<com.noqoush.adfalcon.android.sdk.ADFView
android:id="@+id/adFalconView"
android:layout_width="wrap_content"
android:layout_height="wrap_content" android:layout_alignParentBottom="true"/>
open MyActivity.java file…
import android.app.Activity;
import android.os.Bundle;

import com.noqoush.adfalcon.android.sdk.ADFInterstitial;
import com.noqoush.adfalcon.android.sdk.ADFView;
import com.noqoush.adfalcon.android.sdk.constant.ADFAdSize;

public class MainActivity extends Activity {
String ADF_SITE_ID = "7a24bb1ea112487eb5ced3418f2ce0a6";

ADFInterstitial mADFInterstitial;
//Views
ADFView mADFView;

boolean mTestMode = true;

@Override
protected void onCreate(Bundle savedInstanceState) {
super.onCreate(savedInstanceState);
setContentView(R.layout.activity_main);
mADFView = ((ADFView) findViewById(R.id.adFalconView));
mADFView.initialize(ADF_SITE_ID, ADFAdSize.AD_UNIT_AUTO_BANNER, null, null, true);
mADFView.setTestMode(mTestMode);
mADFView.setRefreshDuration(60);
mADFInterstitial = new ADFInterstitial(this, ADF_SITE_ID, null, mTestMode);
try {
mADFInterstitial.loadInterstitialAd();

} catch (Exception ex) {
ex.printStackTrace();
}
//set refresh duration

}
@Override
protected void onDestroy() {
try{
if(mADFView != null){
mADFView.destroy();
}
} catch (Exception ex) {
ex.printStackTrace();
}
super.onDestroy();
}
@Override
public void onBackPressed() {
// TODO Auto-generated method stub
mADFInterstitial.showInterstitialAd();
}
}
—> Run Your Code.

Leave a Reply